Getting Started Using Digital Tools, Part 1: Teacher Tools

by Jean Oviatt-Rothman
This is Part 1 of a two-part blog series on digital literacy. Read Part 2 here.
Digital tools are essential when teaching remotely and helpful when teaching in person. However, the vast range and number of digital tools available can make getting started feel daunting.
Start by planning your goals and reasons for using digital tools. My goals in selecting tools as a fully-remote math instructor were visual communication, collaboration, and accessibility for all students. As you plan your goals, consider two categories: tools to help you as a teacher and tools to help your students. Instead of being lured by flashy ads or gimmicks, start with your goals to help stay focused as you select and curate your digital toolset. Let’s start by looking at some teacher tools.
Tools for Organization
A Learning Management System (LMS) is an online space to manage your class activities, including assignments, communication, and grades. An LMS is essential for remote classes and quite helpful for in-person classes to keep everyone connected and on track, especially when attendance is unpredictable. Examples include Google Classroom, Canvas, Blackboard, and Moodle. Your program may have suggestions for which LMS to use.
Even if you have experienced one or more of these systems from a student perspective, such as in an online PD workshop, using an LMS as the instructor often presents a learning curve. Here is a short checklist of things to think about and become familiar with when you need to learn a new LMS:
- How to post assignments, view students’ work, and provide feedback
- How to post or provide resources and materials for students
- Communication tools (teacher-to-student and student-to-student)
When I taught remotely using Google Classroom, I was open with my students that I could not see exactly what they were seeing because the “teacher view” and “student view” are different. I frequently reminded them that I was learning this, too, and I did not have all the answers. When questions arose, often more experienced students were willing to share their screens so that their classmates and I could all view the student version together and troubleshoot when necessary. This presented a nice opportunity for some leadership, camaraderie, and collaborative problem-solving. Some types of LMS also offer a preview feature that allows you to see what students see. If your LMS does not, consider creating a second profile and adding yourself as a student user. (Be sure to use a different username for each profile to help distinguish between the two!).
Tools for Teaching
When you add resources to your LMS or your digital toolset, it is important to curate carefully. Too many resources will overwhelm both you and your students. Identify your goals and the most helpful resources for students ahead of time. You will also need to teach students how to use each resource, so be sure to allow time for this in your lesson plans
Visual communication and collaboration were two of my instructional goals. For in-person classes, students can engage in collaborative problem solving by working in groups on a physical whiteboard or a piece of chart paper. One way to encourage in-person communication and collaboration is to provide only one marker to each group so that members need to share, with the expectation that everyone’s ideas are recorded. When I taught remotely, an online digital whiteboard that every student could access was a priority because I wanted to use it for instruction and to be able to see students’ work in real time. Several online collaborative whiteboards are available with different options and educational pricing structures. They include Miro, Mural, and Lucid. Zoom has a whiteboard feature, too, and its functionality is improving.
My program used Miro, and once we familiarized students with its features (navigating, zooming in/out, finding the pen and eraser, using sticky notes), it became a useful and favorite tool for students. Students could work on problems together in small breakout groups or as a whole class, and everyone could see each other’s work and thinking. Sometimes, I divided the infinite whiteboard space into separate, labeled work sections so each student or small group had their own space, and then we zoomed out to view and discuss everyone’s different approaches. I could also screenshot the work from the whiteboard and share it in the LMS as post-class notes.
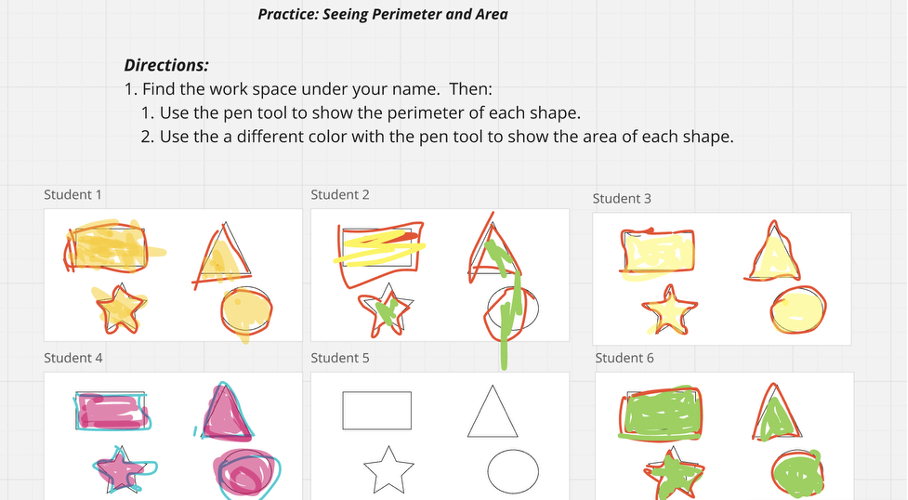
The screenshot below shows one Miro assignment that students worked on individually, then we discussed as a class. Students were practicing differentiating between area and perimeter while also practicing the digital skills of navigating the whiteboard space, using the pen tool, and switching the pen colors/widths. Since this was a practice assignment, I encouraged students to look at each other’s work and ask questions when they felt stuck. We discussed the differences between collaboration and cheating.
To meet my goal for increasing accessibility, we needed straightforward digital tools that provided visual ways to represent and work with a variety of math concepts. I also wanted to streamline the number of tools that my students and I needed to learn. I focused on two go-to resources that I relied upon consistently: Polypad and Amplify Classroom, both of which are free and high-quality. Stay tuned for an upcoming blog that takes a deeper dive into getting students started with these math digital tools.
If you are a Massachusetts adult education teacher interested in free professional development coaching on this topic, contact us using the SABES Coaching Request Form.

Jean Oviatt-Rothman has worked in STEM education for over twenty years. She has taught at the Adult Education (High School Equivalency) and K-12 levels in Massachusetts, with expertise in math and science coaching, remote instruction, and curriculum leadership. Jean is a consultant and coach with the SABES Mathematics and Adult Numeracy Curriculum & Instruction PD Team at TERC and a member of the Adult Numeracy Network.